Fedora 32 and GPU Passthrough (VFIO)
I’ve used Fedora 32 as my main OS for about two years. Overall, it has been a very pleasant experience and has made things such as developing much easier than it would’ve been on Windows.
However… gaming on Linux is frankly a pain in the ass. No matter the state of Vulkan, Proton, Wine, etc, you’ll always find Windows games which will flat out not work. More recently, I found that Escape From Tarkov did not work at all on Linux due to Easy Anticheat.
This has meant that I’ve had to do one of my most hated things in the world… dual booting. When I dual boot I tend to lose access to all the services I have set up on my main computer such as Plex and Jupyterhub, my NGINX routing, and lastly stuff I use to develop such as Jenkins.
Fortunately, a friend of mine reminded me about GPU passthrough, also known as VFIO. This is a process of allowing a VM to have complete control over a PCIe component such as a GPU. If done right, this means you could spin up a Windows VM which has the full power of a physical graphics card whilst never leaving your main OS.
I’ve written this post as I’ve recently gone through the process of setting up a VM with GPU Passthrough recently and spent a lot of time trying to get it working. If I can save someone else an hour of their life trying to troubleshoot a particular issue I’ll consider this post a success.
My Setup
In order to do GPU pass-through, you’ll need to have two graphics cards. A single GPU pass-through is ‘jank’ requiring you to terminate your xorg session in order to switch between Windows and Fedora.
For the purposes of doing GPU passthrough, I purchased the above AMD Radeon RX550 for about $100 NZD. Since I only use two monitors - a primary 32’’ 1440p monitor and secondary vertical 22’’ 1080p monitor, I didn’t need anything particularly overpowered for my host card.
In some other threads I read that having identical GPUs causes issues with the VFIO process. Conversely, I’ve seen people successfully complete this such as the write up found here.
Your set up will be different, so your mileage may vary. Some instructions will have to be adjusted, however my set up is as follows:
- Fedora 32 (Kernel 5.6.10-300.fc32.x86_64)
- ASROCK X399M Taichi
- AMD Ryzen Threadripper 2920X
- NVIDIA GTX 1080
- AMD Radeon RX550
- 32GB DDR4 RAM
- Storage
    - 512GB SSD
    - 256GB SSD
    - 2TB HD
For my Windows VM, I used a dedicated SSD as its storage volume, and mounted it raw rather than using a virtual disk. This is to improve the performance of the VM.
But… How?
My key reference while doing this setup was the following BansheeHero’s excellent guide. Whilst the post itself is not complete, and good chunks of it are cut paste from a different thread, it outlines the general steps required to accomplish the setup.
However… there were some important steps in this guide that weren’t made clear which resulted in me wasting a material amount of time. In this post I will try make these key steps clearer.
IOMMU …and You
IOMMU stands for ‘Input-output memory management unit’, it’s a feature which allows your VMs to take advantage of your computer’s hardware. To accomplish the GPU pass-through this will need to be enabled.
Setting IOMMU in your BIOS
Before proceeding to the next steps, you need to ensure that IOMMU has been ‘Enabled’ in your BIOS. It’s best to explicitly override this value if it has been set to ‘Automatic’ to ensure your computer does what is asked of it.
In my case, my setting was set to ‘Automatic’.
Checking your IOMMU Groups
The next step is to run the following bash script to ensure that your IOMMU groups have been setup correctly.
Your GPU and its audio controller need to be isolated in its own IOMMU group. This also applies to any other PCIe devices you’d like to pass-through to the VM including USB ports and soundcards.
#!/bin/bash
for d in /sys/kernel/iommu_groups/*/devices/*; do
  n=${d#*/iommu_groups/*}; n=${n%%/*}
  printf 'IOMMU Group %s ' "$n"
  lspci -nns "${d##*/}"
done
On running this command, you’ll want to look for your GPU and ensure it’s there. In my case I see the following:
IOMMU Group 29 41:00.0 VGA compatible controller [0300]: NVIDIA Corporation GP104 [GeForce GTX 1080] [10de:1b80] (rev a1)
IOMMU Group 29 41:00.1 Audio device [0403]: NVIDIA Corporation GP104 High Definition Audio Controller [10de:10f0] (rev a1)
In this case, my PCIe devices have the ids 41:00.0 and 41:00.1. They are grouped together and isolated in Group 29.
Installing the Virtualisation Package
You’ll need the packages from the following command:
dnf install @virtualization
My user is in wheel so not much further group configuration was necessary. If you don’t have your user in there you’ll need to do further configuration.
Modifying your GRUB
You’ll need to add some paramaters to your GRUB configuration. You can access the file doing the following command:
vim /etc/sysconfig/grub
Add amd_iommu=on rd.driver.pre=vfio-pci to GRUB_CMDLINE_LINUX, if you have an Intel chip you’ll need to use intel_iommu=on.
Note: I’ve not gone through this process on an Intel machine so I am not 100% sure if there are any other tweaks that need to be done for the rest of the tutorial.
Rebuilding initramfs
In order to allow VFIO to happen, we need to adjust the boot process to ensure that the VFIO drivers are loaded and bound to the relevant PCIe devices rather than the normal ones.
Getting the Device IDs
In my case, I wanted to specifically pass-through my NVIDIA GTX1080. I can find the specific devices by running the following command:
lspci -vnn | grep NVIDIA
This provides me the following output:
41:00.0 VGA compatible controller [0300]: NVIDIA Corporation GP104 [GeForce GTX 1080] [10de:1b80] (rev a1) (prog-if 00 [VGA controller])
41:00.1 Audio device [0403]: NVIDIA Corporation GP104 High Definition Audio Controller [10de:10f0] (rev a1)
For each device I am interested in it’s device ID (10de:10f0, 10de:1b80). We need this information as this is how we’ll inform our bootloader which devices need to be reserved.
Modifying Modprobe
We need to tell Modprobe which devices we want to reserve for VFIO. In order to do this, we run the following command:
echo "options vfio-pci ids=10de:1b80,10de:10f0" > /etc/modprobe.d/vfio.conf
Rebuilding initramfs
Execute the following commands to instruct dracut to load the vfio drivers:
dracut --add-drivers "vfio vfio-pci vfio_iommu_type1" --force
Once this has been completed, we can force a rebuild of initramfs image by executing the following command:
dracut -fv
Pre-reboot Check-in
Before we reboot, we want to make sure all the things we did above has been affected. When you run the following command:
lsinitrd | grep vfio
You should see the following:
-rw-r--r--   1 root     root           41 Mar 17 04:13 etc/modprobe.d/vfio.conf
drwxr-xr-x   3 root     root            0 Mar 17 04:13 usr/lib/modules/5.6.10-300.fc32.x86_64/kernel/drivers/vfio
drwxr-xr-x   2 root     root            0 Mar 17 04:13 usr/lib/modulesKernel driver in use: vfio-pci/5.6.10-300.fc32.x86_64/kernel/drivers/vfio/pci
-rw-r--r--   1 root     root        25068 Mar 17 04:13 usr/lib/modules/5.6.10-300.fc32.x86_64/kernel/drivers/vfio/pci/vfio-pci.ko.xz
-rw-r--r--   1 root     root        13368 Mar 17 04:13 usr/lib/modules/5.6.10-300.fc32.x86_64/kernel/drivers/vfio/vfio_iommu_type1.ko.xz
-rw-r--r--   1 root     root        12320 Mar 17 04:13 usr/lib/modules/5.6.10-300.fc32.x86_64/kernel/drivers/vfio/vfio.ko.xz
-rw-r--r--   1 root     root         3212 Mar 17 04:13 usr/lib/modules/5.6.10-300.fc32.x86_64/kernel/drivers/vfio/vfio_virqfd.ko.xz
If everything is good at this point, you now need to reboot.
Post-reboot Check-in
We now need to ensure that the PCIe devices we specified for VFIO have been correctly reserved. If we run:
lspci -nnv
We see that our NVIDIA GTX 1080 shows the following:
41:00.0 VGA compatible controller [0300]: NVIDIA Corporation GP104 [GeForce GTX 1080] [10de:1b80] (rev a1) (prog-if 00 [VGA controller])
	Subsystem: eVga.com. Corp. Device [3842:6183]
	Flags: bus master, fast devsel, latency 0, IRQ 101, NUMA node 1
	Memory at be000000 (32-bit, non-prefetchable) [size=16M]
	Memory at 80000000 (64-bit, prefetchable) [size=256M]
	Memory at 90000000 (64-bit, prefetchable) [size=32M]
	I/O ports at 4000 [size=128]
	Expansion ROM at bf000000 [disabled] [size=512K]
	Capabilities: [60] Power Management version 3
	Capabilities: [68] MSI: Enable- Count=1/1 Maskable- 64bit+
	Capabilities: [78] Express Legacy Endpoint, MSI 00
	Capabilities: [100] Virtual Channel
	Capabilities: [128] Power Budgeting <?>
	Capabilities: [420] Advanced Error Reporting
	Capabilities: [600] Vendor Specific Information: ID=0001 Rev=1 Len=024 <?>
	Capabilities: [900] Secondary PCI Express
	Kernel driver in use: vfio-pci
	Kernel modules: nouveau

41:00.1 Audio device [0403]: NVIDIA Corporation GP104 High Definition Audio Controller [10de:10f0] (rev a1)
	Subsystem: eVga.com. Corp. Device [3842:6183]
	Flags: bus master, fast devsel, latency 0, IRQ 102, NUMA node 1
	Memory at bf080000 (32-bit, non-prefetchable) [size=16K]
	Capabilities: [60] Power Management version 3
	Capabilities: [68] MSI: Enable- Count=1/1 Maskable- 64bit+
	Capabilities: [78] Express Endpoint, MSI 00
	Capabilities: [100] Advanced Error Reporting
	Kernel driver in use: vfio-pci
	Kernel modules: snd_hda_intel
The thing we’re looking for is Kernel driver in use: vfio-pci. If you see this, you’ve successfully reserved the PCIe deviced for use by the VM.
Setting up your Virtual Machine
Before you Start
The first thing you should check is your QEMU version. You can do this by doing the following:
qemu-kvm --version
This guide assumes you have a QEMU version of 4.2 or greater. There are implications of using earlier versions of QEMU which I will not be covering or addressing in this post.
Setting up your VM
Open up virt-manager and create a new Virtual Machine. You can get a copy of the Windows 10 ISO here.
Once virt-manager is open, do the following steps:
- Create a new VM and use the Windows 10 ISO you’ve just downloaded.
- Specify how much memory and CPU you’d like to allocate your VM. For my particular set up I’ve used 16GB RAM and 8 CPUs.
- When choosing storage, tick ‘Select or create custom storage’ and type to path to your target drive. In this case it was my blank SSD
/dev/sdc1/. - On the next step, tick ‘Customize configuration before install’.
At this point you’ll be brought to a configuration screen, ensure the following things are set:
- Chipset is selected as ‘Q35’
- Firmware is set to UEFI/OVMF
- Add your GPU and its audio controller by clicking ‘Add Hardware’ and selecting Host PCI Device
Once the above are set, we’re ready to start. Hit apply and let Windows 10 install.
Note: We’ll need to tweak CPU settings and topology but we’ll get to that in the optimisation section.
Hiding the Hypervisor
There’s a fair few tweaks we need to do in order to get the VM to work with our NVIDIA card. For whatever reason, NVIDIA does not allow their drivers to be used inside emulations. Luckily for us, we can hide the fact that our VM is a emulation by modifying our virtual machine’s settings.
Open up your VM with the following command, make sure you change the VM to the appropriate name:
EDITOR=vim virsh edit win10
You need to edit your VM configuration to include the following elements:
<domain type='kvm' xmlns:qemu='http://libvirt.org/schemas/domain/qemu/1.0'>
    ...
        <features>
            ...
            <kvm>
                <hidden state='on'/>
            </kvm>
            ...
            <hyperv>
                ...
                <vendor_id state='on' value='whatever'/>
            </hyperv>
            ...
        </features>
    ...
        <qemu:commandline>
            <qemu:arg value='-cpu'/>
            <qemu:arg value='host,hv_time,kvm=off,hv_vendor_id=null'/>
        </qemu:commandline>
</domain>
By changing the above we’ve accomplished the following things:
- We’ve spoofed a
vendor_id - We’ve told QEMU to hide the fact we’re in an emulation
- We’ve passed through some QEMU commands to make doubly sure NVIDIA can’t detect we’re in an emulation.
Step 3 might be a bit of a duplication, but this is what caused my VM to finally work.
Installing NVIDIA Drivers
You can now install NVIDIA drivers, if all went well above you will not see a ‘Error 43’ when you open Device Manager.
Installing Barrier
Once you disable Spice you won’t be able to use your keyboard without passing through a USB port or doing a RDP.
At this point you should install Barrier or something similar. You can find the GitHub repo here. Barrier is a fork of Synergy - it’s awesome. Syngery has terrible support for Fedora.
Note: This a future note for future you, when you try to play games later you may find that your mouse gets locked at the center of the screens and madly spins/rotates - to fix this you’ll need to change your Barrier server settings to the following:
- Emulate relative mouse movements
- Set a hot key to enable screen lock
Disabling Spice
Once you’re happy with your Barrier set up, it’s time to remove Spice.
Shutdown your VM and remove all the Spice components.
Cable Time
EDITOR=vim virsh edit win10
Plug your monitor into your VM’s allocated GPU and start up your VM. You should now see everything work bueno.
At this point, you will now have a functioning VM with GPU pass-through. However… there’s one more things you need to do before your VM will be ready to play games…
CPU Pinning & Topology
Virt-manager’s default allocation of vCPUs is subpar and is not great. In order to get acceptable performance from the virtual machine we need to ensure we allocate
Tuning your Virtual Machine sane CPUs in the configuration.
In my case, doing this configuration doubled the benchmarks of my virtual machines CPU.
Understanding your Cores
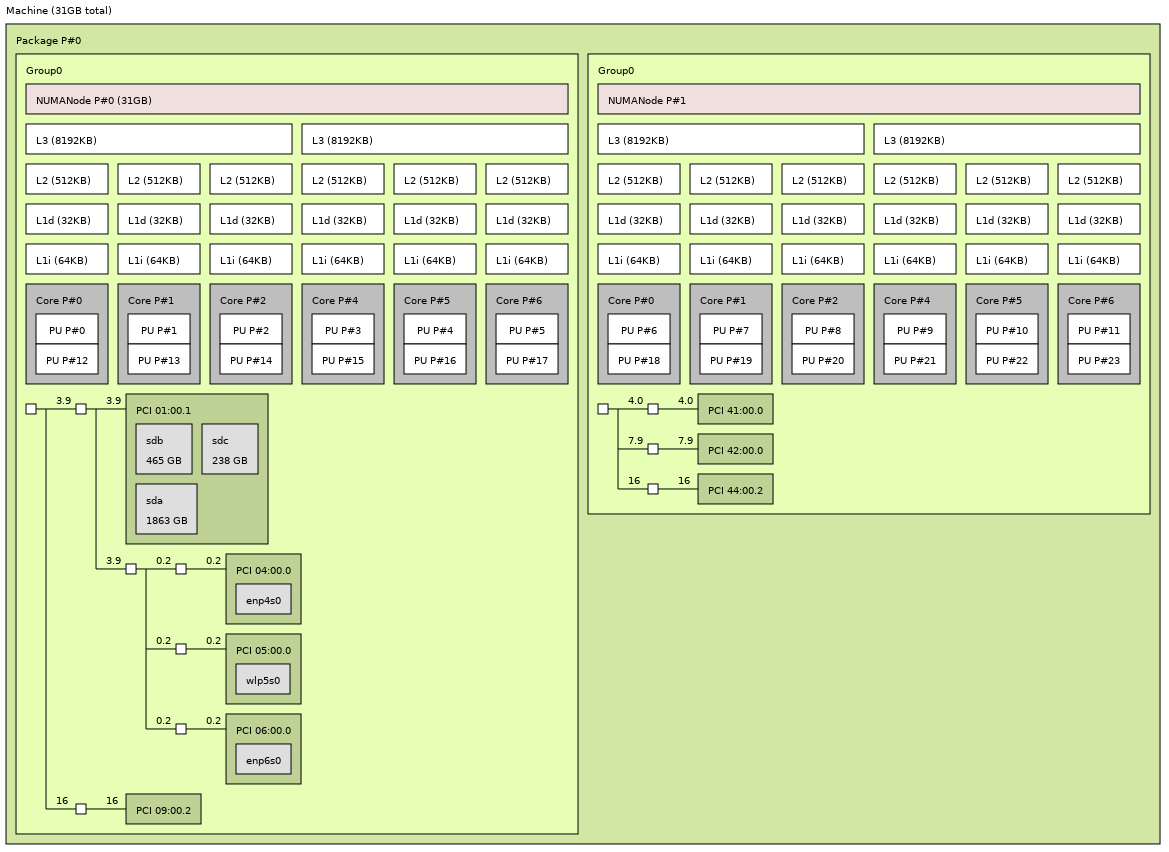
I use lstopo in this section. If you have something else you prefer to use, you can use that too.
In my setup, you can see that cores 6/18 to 11/23 are closer to my GPU PCI 41:00.0. Now that I know which cores to use, I can explicitly allocate them in my virtual machine’s configuration.
Modifying your Settings
Using the following command again:
EDITOR=vim virsh edit win10
Edit your settings to explicitly declare which CPU sets should be used, in my case this is my configuration:
  <vcpu placement='static'>8</vcpu>
  <iothreads>2</iothreads>
  <cputune>
    <vcpupin vcpu='0' cpuset='6'/>
    <vcpupin vcpu='1' cpuset='18'/>
    <vcpupin vcpu='2' cpuset='7'/>
    <vcpupin vcpu='3' cpuset='19'/>
    <vcpupin vcpu='4' cpuset='8'/>
    <vcpupin vcpu='5' cpuset='20'/>
    <vcpupin vcpu='6' cpuset='9'/>
    <vcpupin vcpu='7' cpuset='21'/>
    <emulatorpin cpuset='0-1'/>
    <iothreadpin iothread='1' cpuset='0-1'/>
    <iothreadpin iothread='2' cpuset='2-3'/>
  </cputune>
Modifying your Topology
You can either use the GUI or edit the virtual machine’s configuration via virsh for this part.
You want to ensure that the topology of your vCPUs are sensible, in my scenario I specified a topology of 1 socket, 4 cores, 2 threads for a total of 8 vCPUs.
If you’re using virsh, you want to amend your settings as follows:
<cpu mode="host-model" check="partial">
	<topology sockets="1" dies="1" cores="4" threads="2"/>
</cpu>
Closing Thoughts
It’s a bit of a chore to set up VFIO, but I am very happy with my VM. I’ve been able to remove a lot of ‘hacky’ applications which were installed on my Fedora install such as Citrix Receiver and install it on the VM.
Games have run smoothly without a noticeable drop in performance.
I didn’t cover off audio in this post, for the reason that I was able to route it physically with an AUX cable straight to my speakers. The advantage of doing this was that I had less audio latency.
If you aren’t able to do a similar set up, I recommend you read this article which describes the process of routing audio through pulseaudio.
Alternatively, you can use scream. I haven’t messed around with this library but I’ve heard there are latency issues.
Lastly… I hope the article was useful and good luck!